MyBatis能很好地简化MVC中的模型层与控制层,下面我将会用MyBatis的新概念与Servlet+JDBC的概念做比对。一步步构建一个最简单的JavaWeb应用。
Maven创建项目 IDEA建立新项目时使用Maven创建,普通的Maven项目即可。创建成功后在主目录add framework support中添加Web Aplication,然后在pom.xml中添加依赖:
1 2 3 4 5 6 7 8 9 10 11 12 13 14 15 16 17 <dependencies > <dependency > <groupId > mysql</groupId > <artifactId > mysql-connector-java</artifactId > <version > 5.1.47</version > </dependency > <dependency > <groupId > org.mybatis</groupId > <artifactId > mybatis</artifactId > <version > 3.5.2</version > </dependency > <dependency > <groupId > junit</groupId > <artifactId > junit</artifactId > <version > 4.12</version > </dependency > </dependencies >
IDEA会自动通过依赖来导入jar包,如果没有反应就在右侧栏的Maven选项中更新Maven。
同时添加以下:(用来告诉Mybatis去哪寻找配置文件,后面会解释)
1 2 3 4 5 6 7 8 9 10 11 12 13 14 15 16 17 18 19 20 21 <build > <resources > <resource > <directory > src/main/java</directory > <includes > <include > **/*.xml</include > <include > **/*.properties</include > </includes > <filtering > false</filtering > </resource > <resource > <directory > src/main/resources</directory > <includes > <include > **/*.xml</include > <include > **/*.properties</include > </includes > <filtering > false</filtering > </resource > </resources > </build >
创建子项目 在主目录下新建Moudle,同样选择Maven创建。生成mybatis-theo项目,结构目录和父项目一致。
1
2
3
4
5
6
7
8
9
10
11
12
13
E:\IntelliJ IDEA 2020.2\mabatis ├─pom.xml ├─src | ├─test | | ├─java | ├─main | | ├─resources | | ├─java
继承了父项目的pom.xml的全部内容,子项目的pom.xml只会用来配置一些与该项目有关的特殊配置。
存放mybatis-config.xml,官方规定的名字,按标准来。其中的内容为:
1
2
3
4
5
6
7
8
9
10
11
12
13
14
15
16
17
<?xml version="1.0" encoding="UTF-8" ?> <!DOCTYPE configuration PUBLIC "-//mybatis.org//DTD Config 3.0//EN" "http://mybatis.org/dtd/mybatis-3-config.dtd" > <configuration > <environments default ="development" > <environment id ="development" > <transactionManager type ="JDBC" /> <dataSource type ="POOLED" > <property name ="driver" value ="com.mysql.jdbc.Driver" /> <property name ="url" value ="jdbc:mysql://localhost:3306/mybatis?useSSL=true& useUnicode=true& characterEncoding=UTF-8" /> <property name ="username" value ="root" /> <property name ="password" value ="tzq******" /> </dataSource > </environment > </environments > </configuration >
显然这和我们的Druid连接池很像,该配置文件用来连接数据库的。
IDEA连接数据库MySQL
右侧栏的DataBase按钮里点击添加,选择MySQL。之后在Advanced里找到serverTimezone,设值为GMT。然后再Gernal中填入数据库的账号密码,点击Test Connection,连接成功后就能在IDEA上操作数据库了。再次点击DataBase就可以看到库中的表了。
配置映射路径
1 2 3 <mappers > <mapper resource ="com/theo/dao/UserMapper.xml" /> </mappers >
这是用来告诉sqlSession去哪个配置文件寻找映射的,后面会解释。
这里用来存放整个工程的代码,一般情况下会有以下几个包:Dao、entity、utils。每个包实现的功能和Servlet+JDBC这种方式十分相似。
用来存放测试文件,测试成功后再放到main文件中。这是一种良好习惯。
实现Moudle层 entity 定义实体类,属性值一定要和数据库中的属性值相同!!
1
2
3
4
5
public class User private int id;private String username;private String password;
再插入Setter,Getter,toString,Structure方法,使之形成一个JavaBean类。
一定要注意生成Structure方法时要有无参的构造方法 :之后通过reslutType返回实例时是先通过无参构造方法生成实例,再通过Getter&Setter填充属性的!!!!
utils 创建com.theo.utils包,按照以往知识可知这里实现的是连接数据库相关的功能,比如之前的:创建连接池、获取链接、关闭连接、提交回滚事务等,而现在是创建sqlSession及相关功能。
1
2
3
4
5
6
7
8
9
10
11
12
13
14
15
16
public class MyBatisUtils private static SqlSessionFactory sqlSessionFactory;static {try {"mybatis-config.xml" ;new SqlSessionFactoryBuilder().build(inputStream);catch (IOException e) {public static SqlSession getSqlSession () return sqlSessionFactory.openSession();
和创建Druid连接池一样,使用IO流更为方便,只不过这里的mybatis-config.xml代替了之前的database.properties。SqlSession与JDBC的连接完全不一样,获取的SqlSession将直接接触Dao层的接口类,总之,utils层初步完成。
**sqlSession.openSession(true)**设置事务自动提交,之后DML操作就不需要再sqlSession.commit()了
Dao 创建com.theo.dao包,同样的这里实现的是对数据库信息的CRUD(增删查改)功能。以获取全部信息为例,对应SELECT语句。
1
2
3
public interface UserDao List<User> getUserList () ;
不同于以往做法(创建com.theo.dao.impl包,其中创建UserDaoimpl类来具体实现接口:创建小车,填充SQL语句,返回结果),这回在com.theo.dao包下创建UserMapper.xml,内容如下:
1
2
3
4
5
6
7
8
9
<?xml version="1.0" encoding="UTF-8" ?> <!DOCTYPE mapper PUBLIC "-//mybatis.org//DTD Mapper 3.0//EN" "http://mybatis.org/dtd/mybatis-3-mapper.dtd" > <mapper namespace ="com.theo.dao.UserDao" > <select id ="getUserList" resultType ="com.theo.entity.User" > </select > </mapper >
namespace="com.theo.dao.UserDao"说明这组映射都是实现接口UserDao的,如果接口的方法涉及SELECT语句,就像选用select标签,id="getUserList"指明该映射实现的方法名,resultType="com.theo.entity.User"表明方法的返回类型,虽然明着是List<User>,但本质还是一个个User。标签里填写的就是SQL语句。
1
2
3
4
5
6
7
8
9
10
11
12
public List<Admin> selectAll () null ;try {"SELECT * FROM admin;" , new BeanListHandler<Admin>(Admin.class));catch (SQLException throwables) {return admins;
与传统方法对比,该方法省去了除填充SQL语句外的一切代码,如获取链接,提交/回滚等等。最重要的是:实现了SQL与java代码的完全分离,如果要更改SQL,只需要更改配置文件。只有在添加删减接口方法时才会去碰java代码。
之前提到过需要在mybatis-config.xml添加<mappers><mapper resource="com/theo/dao/UserMapper.xml"/></mappers>,因为创建的SqlSession只配备了mybatis-config.xml的信息,同时SqlSession需要与Dao对接,即调用接口中的方法getUserList, 就需要通过这个路径找到接口配置文件,也就相当于找到接口实现方法,进而Utils和Dao联系了起来。(以往是通过在Dao调用Utils.function()来联系起来的)。
测试 在src.test.java下创建com.theo.dao.UserDaoTest.java,这也是一个行为习惯,测试哪个Dao接口就对称的建立DaoTest。
1
2
3
4
5
6
7
8
9
10
11
12
13
14
15
public class UserDaoTest @Test public void test () for (User user : userList) {
UserDao userDao = sqlSession.getMapper(UserDao.class);可以看出SqlSession的强大之处,直接返回一个接口实现类。
SqlSession.getMapper(Class)会先访问mybatis-config.xml中的<mappers>,找到Dao层的DaoMapper.xml就相当于具有了里面所有的映射方法,但DaoMapper.xml中可能会有多个<mapper>,那么设置UserDao.class就能对应<mapper namespace="com.theo.UserDao">。这样的多重对应后返回一个接口实现类的实例 userDao,就可以直接调用所有接口方法了。
至此,一个基于MyBatis的查询功能完成。工程源码下载
MyBatis配置优化 核心配置文件(mybatis-config.xml) 环境配置(<environments) 1 2 3 4 5 6 7 8 9 10 11 12 <environments default ="development" > <environment id ="development" > <transactionManager type ="JDBC" /> <dataSource type ="POOLED" > <property name ="driver" value ="com.mysql.jdbc.Driver" /> <property name ="url" value ="jdbc:mysql://localhost:3306/mybatis?useSSL=true& useUnicode=true& characterEncoding=UTF-8" /> <property name ="username" value ="root" /> <property name ="password" value ="tzq1635886602" /> </dataSource > </environment > <environment > ...</environment > </environments >
mybatis可以同时配置多个环境,但SqlSessionFactory只能选择一种环境,即默认环境development。这样我们可以先将不同数据库的环境配置好,然后需要切换数据库时直接更改default值就行。
外部配置文件(.properties) com.theo.resource下新建database.properties:
1 2 3 4 5 driver = com.mysql.jdbc.Driver url = jdbc:mysql://localhost:3306/mybatis?useSSL=true&useUnicode=true&characterEncoding=UTF-8 username =root password =tzq1635886602
在环境配置中加入引用,环境配置中就可以用引用方式代替.
1 <properties resource ="database.properties" />
1 2 3 4 5 6 7 8 9 10 11 <environments default ="development" > <environment id ="development" > <transactionManager type ="JDBC" /> <dataSource type ="POOLED" > <property name ="driver" value ="${driver}" /> <property name ="url" value ="${url}" /> <property name ="username" value ="${username}" /> <property name ="password" value ="${password}" /> </dataSource > </environment > </environments >
内部配置(<properties) 除了获取外部配置,在可以在内部补充:
1 2 3 4 <properties resource ="database.properties" > <property name ="user" value ="root" /> <property name ="pwd" value ="tzq1635886602" /> </properties >
这样在环境配置中:
1 2 3 4 5 6 7 8 9 <environment id ="development" > <transactionManager type ="JDBC" /> <dataSource type ="POOLED" > <property name ="driver" value ="${driver}" /> <property name ="url" value ="${url}" /> <property name ="username" value ="${user}" /> <property name ="password" value ="${pwd}" /> </dataSource > </environment >
环境配置先加载外部配置文件,然后再加载内部配置,如果重复则会覆盖原先的键值对
别名(<typeAliases) 1 2 3 <typeAliases > <package name ="com.theo.entity" /> </typeAliases >
对实体类包 注解,之后MyBatis会在包名下面搜索需要的JavaBean(User.class),然后在Mapper.xml实现接口类方法时,返回类型由resultType="com.theo.entity.User"改为resultType="User",也就是从绝对路径改写成相对路径。
注解别名(@Alias) 1 2 3 4 5 6 7 @Alias("Admin") public class User private int id;private String username;private String password;
将实体类 改名,这样resultType="User"也可以换做resultType="Admin"。但没什么用,不建议。
映射器(<mappers) MapperRegister:注册绑定我们的Mapper文件,之前提到过SqlSession要找到映射的接口类,进而生成其实现类实例。
使用resource绑定Mapper配置文件 1 2 3 <mappers > <mapper resource ="com/theo/dao/UserMapper.xml" /> </mappers >
使用class绑定接口类 1 2 3 <mappers > <mapper class ="com.theo.dao.UserMapper" /> </mappers >
接口类(UserMapper.class)必须和其Mapper配置文件(UserMapper.xml)同名
接口类与其Mapper配置文件必须在同一包下
使用package绑定包 1 2 3 <mappers > <package name ="com.theo.dao" /> </mappers >
接口类(UserMapper.class)必须和其Mapper配置文件(UserMapper.xml)同名
接口类与其Mapper配置文件必须在同一包下
注意这里的同一个包并没有限制得那么死,并不是说UserMapper.class和UserMapper.xml都在java.com.theo.dao下,实际开发更多用的是把Mapper配置文件放在resource.com.theo.dao下,包的路径一样生成的target目录中class和xml就会在同一包下。
ResultMap结果集映射 在创建实体类时我们强调过实体类的属性名必须和数据库的列名完全一致,因为MyBatis处理SQL语句时会自动用上类型处理器 (可以理解为QueryRunner中的BeanHandler),比如语句SELECT id,username,password FROM admin;,类型处理器会去寻找实体类中的对应属性并一一填充进去,包装成一个实例。但如果实体类中属性名为pwd,从数据库返回的password无法装入,那么最后形成的实例中password的值为空。
为了解决实体类属性名设定的局限性,ResultMap结果集就出现了。
1 2 3 4 5 6 7 8 9 <resultMap id ="UserMap" type ="User" > <result column ="password" property ="pwd" /> </resultMap > <select id ="getUserList" resultMap ="UserMap" > </select >
原先返回resultType,现在返回resultMap,resultMap对应了type。
ResulMap做的事情就是把数据库返回的列名矫正成实体类的属性值,这样包装成实体类实例时就能一一对应并填充上了。当然,如果列明和属性值一样,就不需要做映射了
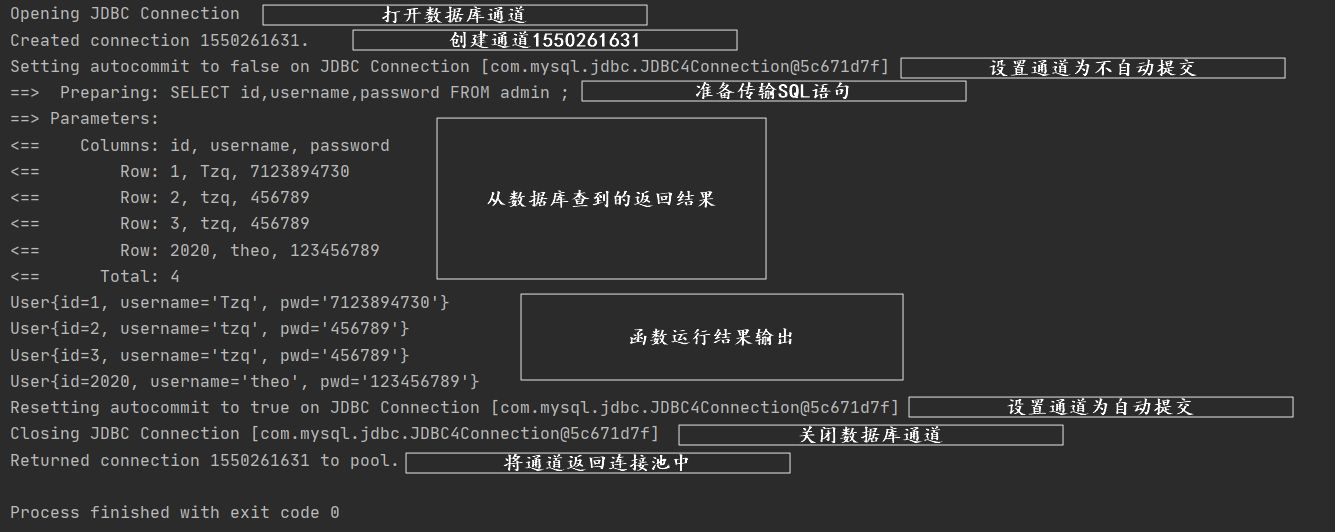
日志 如果一个数据库操作出现了异常,控制台输出错误栈时该SQL将会重点突出。
1 2 3 <settings > <setting name ="logImpl" value ="STDOUT_LOGGING" /> </settings >
在核心配置文件中配置好日志后,运行查询所有数据的函数,控制台输出日志:
向pom.xml导入Maven依赖:
1 2 3 4 5 6 <dependency > <groupId > log4j</groupId > <artifactId > log4j</artifactId > <version > 1.2.17</version > </dependency >
在resource下创建log4j.properties
1 2 3 4 5 6 7 8 9 10 11 12 13 14 15 16 17 18 19 20 21 22 23 24 25 26 27 28 29 30 31 32 33 34 35 36 37 38 39 40 41 42 43 44 log4j.rootLogger =debug,stdout,info,debug,warn,error log4j.appender.stdout =org.apache.log4j.ConsoleAppender log4j.appender.stdout.layout =org.apache.log4j.PatternLayout log4j.appender.stdout.layout.ConversionPattern = [%d{yyyy-MM-dd HH:mm:ss a}]:%p %l%m%n log4j.logger.info =info log4j.appender.info =org.apache.log4j.DailyRollingFileAppender log4j.appender.info.DatePattern ='_'yyyy-MM-dd'.log' log4j.appender.info.File =./log/info.log log4j.appender.info.Append =true log4j.appender.info.Threshold =INFO log4j.appender.info.layout =org.apache.log4j.PatternLayout log4j.appender.info.layout.ConversionPattern =%d{yyyy-MM-dd HH:mm:ss a} [Thread: %t][ Class:%c >> Method: %l ]%n%p:%m%n log4j.logger.debug =debug log4j.appender.debug =org.apache.log4j.DailyRollingFileAppender log4j.appender.debug.DatePattern ='_'yyyy-MM-dd'.log' log4j.appender.debug.File =./log/debug.log log4j.appender.debug.Append =true log4j.appender.debug.Threshold =DEBUG log4j.appender.debug.layout =org.apache.log4j.PatternLayout log4j.appender.debug.layout.ConversionPattern =%d{yyyy-MM-dd HH:mm:ss a} [Thread: %t][ Class:%c >> Method: %l ]%n%p:%m%n log4j.logger.warn =warn log4j.appender.warn =org.apache.log4j.DailyRollingFileAppender log4j.appender.warn.DatePattern ='_'yyyy-MM-dd'.log' log4j.appender.warn.File =./log/warn.log log4j.appender.warn.Append =true log4j.appender.warn.Threshold =WARN log4j.appender.warn.layout =org.apache.log4j.PatternLayout log4j.appender.warn.layout.ConversionPattern =%d{yyyy-MM-dd HH:mm:ss a} [Thread: %t][ Class:%c >> Method: %l ]%n%p:%m%n log4j.logger.error =error log4j.appender.error = org.apache.log4j.DailyRollingFileAppender log4j.appender.error.DatePattern ='_'yyyy-MM-dd'.log' log4j.appender.error.File = ./log/error.log log4j.appender.error.Append = true log4j.appender.error.Threshold = ERROR log4j.appender.error.layout = org.apache.log4j.PatternLayout log4j.appender.error.layout.ConversionPattern = %d{yyyy-MM-dd HH:mm:ss a} [Thread: %t][ Class:%c >> Method: %l ]%n%p:%m%n
注解开发 对于没有特殊要求,注解开发可以简化接口方法的实现
1 2 3 4 5 6 7 public interface UserMapper @Select("select * from admin") List<User> getUserList () ;@Select("select * from admin where id=#{id}") User getUser (@Param("id") int id) ;
这样就不需要在Mapper配置文件中添加<select 映射了,但也要注意在核心配置文件中就不能映射到Mapper.xml,因为不是在那里实现接口方法的。<mapper resource="com/theo/dao/UserMapper.xml"/>就需要改成<mapper class="com.theo.dao.UserMapper"/>或是<package name="com.theo.dao"/>
注解开发只能用于SQL语句简单无比的的接口方法上,这种开发是无法解决如列名与属性名不一致的情况的!!!
MyBatis执行流程剖析 随便在一个测试中debug,断点定位到UserMapper userMapper = sqlSession.getMapper(UserMapper.class);
1 2 String resource = "mybatis-config.xml" ;
1 new SqlSessionFactoryBuilder()
1 new SqlSessionFactoryBuilder().build(inputStream);
而build(inputStram)又会调用
1 XMLConfigBuilder parser = new XMLConfigBuilder(inputStream, environment, properties);
这里解析了内部配置文件,环境等
1 sqlSessionFactory = new SqlSessionFactoryBuilder().build(inputStream);
创建事务管理器transaction,用来管理dataSource,autoCommit,connection,level等等
1 UserMapper userMapper = sqlSession.getMapper(UserMapper.class);
1 List<User> userList = userMapper.getUserList();
执行完CURD后要记得手动回滚或提交
复杂查询环境 环境搭建 构建两个表,一个student一个teacher。student表中tid作为外键连接teacher表中id。
1 2 3 4 5 6 7 create table student(
1 2 3 4 5 create table teacher(
在student中插入数据(1,”tzq1”,1)、(2,”tzq2”,1)、(3,”tzq3”,1),在teacher中插入数据(1,”theo”)。
如上,三个学生都对应了同一个老师。我们需要查询出所有学生的id,姓名以及所属老师。那么设计Student和Teacher实体类如下:
1 2 3 4 5 public class Student int id;
1 2 3 4 public class Teacher int id;
不难发现,简单的select语句依然会犯属性名与列名不对应的错误,甚至连类型都不一致,这就不是单靠resultMap改名就能解决的事。
association结果映射 如上所说,association作用就是把tid更名为teacher,同时将类型int更改为Teacher
1 2 3 4 5 6 7 8 9 10 11 12 <select id ="getStudentList" resultMap ="tid2teacher" > </select > <resultMap id ="tid2teacher" type ="Student" > <association property ="teacher" column ="tid" javaType ="Teacher" select ="getTeacher" /> </resultMap > <select id ="getTeacher" resultType ="Teacher" > </select >
调用函数时,第一步SELECT * FROM student获取到tid,返回时准备通过resultMap映射。第二步知道将tid映射成teacher,因为类型不一致就要通过association更改:javaType为映射后的类型,为了达到这个结果,执行select。第三步将tid作为参数传入getTeacher,SQL返回结果经resultType封装成Teacher对象,该对象会填充到属性teacher中。
association嵌套映射 上一种方式需要额外写一套<select>,而嵌套映射不需要:
1 2 3 4 5 6 7 8 9 10 11 12 13 14 <select id ="getStudentList" resultMap ="Student2Teacher" > </select > <resultMap id ="Student2Teacher" type ="Student" > <result property ="id" column ="sid" /> <result property ="name" column ="sname" /> <association property ="teacher" javaType ="Teacher" > <result property ="name" column ="tname" /> <result property ="id" column ="tid" /> </association > </resultMap >
调用函数时,第一步SQL语句拿出了student表中的id、name和teacher表中的id、name并分别取了别名,返回时准备通过resultMap映射。第二步将要用的sid,sname更名为id、name。在association中把tid,tname更名为id,name;通过javaType的指示封装成Teacher的对象,填入到teacher属性中。
以上两种是思路完全不同的方法,比较推荐第二种,更易理解与记忆
一对多处理 一个老师也对应了多个学生,我们修改下实体类属性:
1 2 3 4 5 public class Student int id;int tid;
1 2 3 4 5 public class Teacher int id;
相较于多对一处理,这回需要把与id关联的所有student元组聚合成列表,填充到student属性中。
collection 1 2 3 4 5 6 7 8 9 10 11 12 13 14 <select id ="getTeacherList" resultMap ="Teacher2Student" > </select > <resultMap id ="Teacher2Student" type ="Teacher" > <result property ="id" column ="tid" /> <result property ="name" column ="tname" /> <collection property ="student" ofType ="Student" > <result property ="id" column ="sid" /> <result property ="name" column ="sname" /> <result property ="tid" column ="stid" /> </collection > </resultMap >
注意的是:SQL查出的是两表的广义笛卡尔积,新表中同一老师id的元组,其sid、sname、stid重命名为student、id、tid再封装成Student对象,这样的多个对象形成集合填充到student属性中。
动态SQL语句 where+if 标签 在UserMaper.class中新增一个方法:通过Map传入想要查询的条件,如果Map为空就查询出所有信息
1 List<User> getUserMap (Map map) ;
因为输入的数据不一定都是一样的,所以这个方法的SQL语句也是动态变化的:
1 2 3 4 5 6 7 8 9 10 11 12 13 <select id ="getUserMap" resultType ="User" parameterType ="map" > <where > <if test ="id != null" > </if > <if test ="username != null" > </if > <if test ="password != null" > </if > </where > </select >
如果输入的map为{id=1,username=tzq},那么就会拼接出SQL语句:SELECT id,username,password FROM admin WHERE id = 1 AND username = tzq;。当然,如果map中id字段为空,并不会直接把AND username = #{username}直接拼接到WHERE后面,而是会自动删去AND以保证语法的合法性。
where+choose 标签 1 2 3 4 5 6 7 8 9 10 11 12 13 14 15 16 <select id ="getUserMap" resultType ="User" parameterType ="map" > <where > <choose > <when test ="id != null" > </when > <when test ="username != null" > </when > <when test ="password != null" > </when > </choose > </where > </select >
choose标签有点像java的switch语句,当有个条件成立时就将语句拼接到SQL后面,然后就自动退出choose标签了(相当于break)。也就是说即使输入map为{id=1,username=tzq},满足了id,就不会再去插入AND username = #{username}。
还有一个标签<otherwise>...</otherwise>,只有当when都没有匹配时就会匹配该标签,并拼接到SQL语句后面。这样如果在标签中填入恒为错误的语句,这样当用户输入的map为空时就无法查到任何信息了。
set标签 在UserMaper.class中新增一个方法:通过Map传入想要更改的属性(用户名,密码),但需要id作定位。
1 int UpdateUserMap (Map map)
因为输入的数据不一定都是一样的,所以这个方法的SQL语句也是动态变化的:
1 2 3 4 5 6 7 8 9 10 11 12 <update id ="UpdateUserMap" parameterType ="map" > <set > <if test ="username != null" > </if > <if test ="password != null" > </if > </set > </update >
这里最后一个if标签里可以添加,,因为set标签默认配置了trim标签,会将导致SQL语法错误的,自动删去。